Since Windows Vista was released, Windows has had a security feature called the Virtual Store. Some legacy applications will try and read/write configuration files in a location that would require administrative privledges (eg. C:\program files\<application>). The Virtual Store is used to allow these applications to continue to be able to read/write files in this location (virtually), but they get stored in the Virtual Store. They just appear to virtually be under their original location. This happens transparently to the application.
The location for the Virtual Store is as follows:
C:\Users\<username>\AppData\Local\VirtualStore
To easily access this location, paste the following path into the location/url bar in Windows Explorer:
%LOCALAPPDATA%\VirtualStore
This will automatically convert the %LOCALAPPDATA% variable into the local application data folder for the currently logged in user.
OR
C:\Users\%USERNAME%\AppData\Local\VirtualStore
This will automatically convert the %USERNAME% variable into the username of the currently logged in user.
For more information on the Virtual Store security system, you can visit http://msdn.microsoft.com/en-us/library/windows/desktop/bb756960.aspx
There may be times when you need to set up a static route in Windows to allow your PC to access a network that is not accessible via the default gateway route. An example of this would be if you had a inter office VPN. You would want your main internet traffic to go via a default gateway (your main cable/adsl router), and traffic destined for the subnet of the other office would go via the device managing the VPN connection, assuming its not the same device that is managing the main internet connection.
Setting up a static route in Windows:
Open the command prompt
(If using windows Vista/Windows 7/Windows 2008/or higher, you will need to run the command prompt using the “run as administrator” option).
Adding the static route:
route add <destination> mask <netmask> <gateway>
Destination = The destination network address.
Netmask = The netmask for the destination network.
Gateway = The gateway/router ip address to route the traffic through.
eg:
route add 192.168.200.0 mask 255.255.255.0 192.168.0.254
This adds a route for the 192.168.200.0/24 network, so that traffic destined for this network gets routed through 192.168.0.254. The gateway address must be on on the same network subnet that you are on.
To make a route persistent across reboots, make sure to add the “-p” parameter to the route command.
route -p add 192.168.200.0 mask 255.255.255.0 192.168.0.254
Test connectivity using the ping and tracert (trace route) commands to make sure the destination network is accessible and going via the correct route.
There may be times when you want to close a process from the command line on a Windows machine. The ‘taskkill’ command allows you to kill processes/programs by process id or exe name (image name).
You can do the same thing from the windows task manager, but sometimes this is not suitable. For example, if you have a number of Internet Explorer windows open, they will each run under their own process. If using the task manager, you have to kill each process separately. With taskkill you can specify to kill the exe/image name ‘iexplore.exe’ and it will terminate all instances of that process.
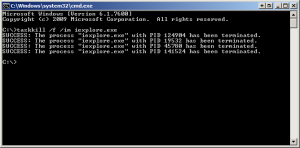
Example taskkill command:
taskkill /f /im iexplore.exe
/f = Forcefully terminate the process
/im = Kill processes based on image name (exe name).
Example screenshot:

Use the following command to get more taskkill parameters:
taskkill /?

