To generate SSH public and private key pairs on Windows, one of the easiest tools to use, is the PuTTY Key Generator “puttygen.exe” (which can be downloaded from here).
The resulting generated files from the PuTTY Key Generator can be used to set up public key authentication with a remote server, allowing for more secure authentication over normal password based authentication (requires disabling password based authentication).
Download the PuTTY Key Generator
You can download puttygen from the following url:
https://www.chiark.greenend.org.uk/~sgtatham/putty/latest.html
Run puttygen.exe
When puttygen has loaded you will be presented with a screen such as this:
Generate the public and private keys
Click the “Generate” button on the main window to start the process of generating the key data.
While this is happening, you will need to move your mouse around in the blank area at the top of the application. This is used to help randomize the data used to generate the keys.
Once the progress bar has gone through, the public and private key data will have been generated, and you are ready to save the keys.
Saving the public and private keys
Public Key:
Simply press the “Save public key” button. This will be used on the remote host you want to be able to connect into remotely, using the private key.
Private Key:
You have the option to enter a passphrase if you want to make the key more secure. Enter that in, and the confirmed passphrase.
After thats done (or if you dont want to use a passphrase), simply press the “Save private key” button. Store this key in a safe place.
Using the private key in PuTTY
For information on how to use the private key file in PuTTY, please check the following page:
Using SSH Private Key Files with PuTTY
The following guide shows you how to log into a remote server using your private key file. It assumes you already have the associated public key already added into the remote hosts authorized_hosts file.
Download PuTTY
Download PuTTY if you don’t have it installed yet.
You can download PuTTY from the following url:
https://www.chiark.greenend.org.uk/~sgtatham/putty/latest.html
Open PuTTY
Run Putty.
You should be presented with a screen like this:
Enter in the host name or IP address of the host you want to connect to now, ready to go onto the next step.
Select private key file
Browse the category tree on the left to Connection -> SSH -> Auth
Press browse, and select your private key file.
Connect to remote server
All that’s left to do now, is to press the “Open” button.
You will be asked for the login username as per normal. You will then be asked for the private key passphrase. If you didn’t set a passphrase, you should now be logged into the server.
SSH allows for both password based authentication, as well as public key authentication. Public key authentication is generally regarded as being more secure, as it isn’t as prone to brute force login attempts (if you disable password based authentication). The private key can also have a passphrase associated with it, which makes public key authentication even more secure if needed.
Sometimes cloud servers will let you put a public key in as a authorized authentication key when the cloud server is created, preventing the need for password based authentication to be enabled by default.
Generate a new SSH public and private key pair:
$ ssh-keygen -t rsa -C "identifying comment" -f keypair
“Identifying comment” can be any string that will assist in determining which key this is. “username@hostname” of the machine where you are connecting from would be a good example.
eg:
$ ssh-keygen -t rsa -C "identifying comment" -f keypair
Generating public/private rsa key pair.
Enter passphrase (empty for no passphrase):
Enter same passphrase again:
Your identification has been saved in keypair.
Your public key has been saved in keypair.pub.
The key fingerprint is:
54:91:95:a1:6c:c9:dc:69:22:a4:04:6a:af:1b:f7:1d identifying comment
The key's randomart image is:
+--[ RSA 2048]----+
|    ... . o+oo   |
|   . . o =.+..   |
|  o   . o O +    |
| . .   . o o     |
|    .   S        |
|   .             |
|  o .   E        |
|   + . . .       |
|  .   . .        |
+-----------------+
$
This will generate two files, “keypair” and “keypair.pub”. “keypair” being the private key that you need to keep secure, and “keypair.pub” being the public key, that can be put on servers that you want to be able to log into with the private key.
Change the filename to suit your needs. This example uses “keypair” for the examples.
The contents of the public key file “keypair.pub” can be inserted into the ~/.ssh/authorized_keys file on the machine that you want to be able to connect into remotely. This must be done for the specific user.
Insert public key into authorized keys
View the contents of the public key file:
$ cat keypair.pub
eg:
$ cat keypair.pub
ssh-rsa AAAAB3NzaC1yc2EAAAADAQABAAABAQDGZyIXXpdrvMJNPvC+Mk6ziW8TRQWCQCzWq7CU4FkssTC1/p4INbEsaeC6ZS4w810QnAtzdWDgqm5u7GeJ8HNQUvTTGSLITtqzXSSDyuRq+qJehTlRQSklHWoviYwZoflz6yh6vSP9uDE9Xh75PfMBTHETVt3nqhQ/lGkrPdog6oo+F8r5rFQpjMatYKdbfsma/pVzORQnBMuaqGRCnFtqWu5mMJvUUa3Nzu07PH7lUHU8tra124OtJrOIBJfG7k0iFMmKS3v9kvNLFvymHtEDn4noclQsJ+5FQEe7BebhZwyhGxzscM0U3mTtfPd8wtwqQNLPmDr+/q8b4r23w5fR identifying comment
$
Take note of the output, and copy it into the clipboard if possible, or use some other method to get this file/data onto the remote machine, as it will be used in the next step.
On the remote server you want to be able to log into:
$ echo "ssh-rsa AAAAB3NzaC1yc2EAAAADAQABAAABAQDGZyIXXpdrvMJNPvC+Mk6ziW8TRQWCQCzWq7CU4FkssTC1/p4INbEsaeC6ZS4w810QnAtzdWDgqm5u7GeJ8HNQUvTTGSLITtqzXSSDyuRq+qJehTlRQSklHWoviYwZoflz6yh6vSP9uDE9Xh75PfMBTHETVt3nqhQ/lGkrPdog6oo+F8r5rFQpjMatYKdbfsma/pVzORQnBMuaqGRCnFtqWu5mMJvUUa3Nzu07PH7lUHU8tra124OtJrOIBJfG7k0iFMmKS3v9kvNLFvymHtEDn4noclQsJ+5FQEe7BebhZwyhGxzscM0U3mTtfPd8wtwqQNLPmDr+/q8b4r23w5fR identifying comment" >> ~/.ssh/authorized_keys
If you have chosen to copy the public key file to the remote host instead, you can issue the following command instead:
$ cat keypair.pub >> ~/.ssh/authorized_keys
Logging into remote ssh server using the private key file
To connect to the remote host using SSH you can use the following command:
$ ssh -i keypair user@hostname
This will use the private key called “keypair” created earlier, and assuming the remote server has the public key added to the “user” users authorized_keys file, you should be able to log into the remote system.
SSH allows the use of encryption keys to be used to allow logging into a system instead of having to remember a plain text password.
This is great for use in scripts, and automated tasks, but can be a problem is anyone else ever gets the keys somehow.
If the keys become compromised, you must generate new SSH keys.
With the increasing use of virtual servers nowadays, if you are creating new servers based on a image file/backup, you may find the new server has the same keys as the original. You should generate new SSH keys on the new server if that is the case.
Generate new SSH keys:
ssh-keygen -N '' -t rsa -f /etc/ssh/ssh_host_rsa_key
ssh-keygen -N '' -t dsa -f /etc/ssh/ssh_host_dsa_key
Restart the SSH server for the new keys to take effect.
Changing the port number that your SSH server listens on is a simple way to prevent random brute force login attacks against your server. While people can still perform attacks against SSH running on a different port number, most automated tools will default to port 22, and not actually do a full port scan.
Any port number can be used, as long as it is not already in use by another service.
Note: Make sure you are logged in as a user with root privledges when running these commands.
Open the /etc/ssh/sshd_config file in your favorite editor.
# vi /etc/ssh/sshd_config
Look for the following line (it may be commented out, as port 22 is the default):
Port 22
or
#Port 22
Edit this line to reflect the port number you wish to listen on. Un-comment it if it was commented out:
Port 22843
This will set up the SSH server to listen on port 22843.
Save the file and exit the editor.
Restart the SSH daemon:
Ubuntu:
$ sudo service ssh restart
CentOS:
# service sshd restart
FreeBSD:
# service sshd restart
Confirm that it is listening on the new port number by issuing the following command:
netstat -an | grep LISTEN
Make sure that next time you connect, you specify the new port number.
Most Linux distributions allow the root user to connect in via SSH, and CentOS is no exception. It is recommended that root logins are never used, and you should use either su or sudo to elevate the permissions of a normal user account. As such, the best option is to disable root logins in the SSH server configuration file.
Note: these commands should be run as a user with root privileges (sudo or su), or from the console as root.
Open the /etc/ssh/sshd_config file in your editor of choice (vi in this example):
# vi /etc/ssh/sshd_config
There should be a line containing the following:
#PermitRootLogin yes
Edit this to read:
PermitRootLogin no
(Make sure you un-comment the line too)
Save the file and exit the editor.
Restart the SSH server:
# service sshd restart
or
# /etc/init.d/sshd restart
Root logins over SSH should now be disabled.
Most Linux distributions allow the root user to connect in via SSH, however if you try to connect into Ubuntu as root after a default install, you will find that you wont be able to get in. While it may look like the root account is not permitted to login, it is just because that the root account doesn’t have a password set. If you end up setting a password on the root account for some reason, you will be able to SSH in as root.
It is recommended that root logins are never used, and you should use either su or sudo to elevate the permissions of a normal user account. As such, the best option is to disable root logins in the SSH server configuration file.
Open the /etc/ssh/sshd_config file in your editor of choice (nano in this example):
$ sudo nano /etc/ssh/sshd_config
There should be a line containing the following:
PermitRootLogin yes
Edit this to read:
PermitRootLogin no
Save the file and exit the editor.
Restart the SSH server:
$ sudo service ssh restart
or
$ sudo /etc/init.d/ssh restart
Root logins over SSH should now be disabled.
VMWare ESXi/vSphere 5 has the option to accept SSH connections to the server, to allow access to the file system of the server itself. By default SSH is disabled, and its not the easiest setting to find if you do need to enable it. This guide will show you how to enable the SSH server.
Load up the vSphere client, and connect to the ESX/ESXi/vSphere host machine you wish to enable SSH on.
Make sure the actual VMWare server machine is selected on the left hand listing.
Click on the “Configuration” tab.

Click on “Security Profile” link from the “Software” section.
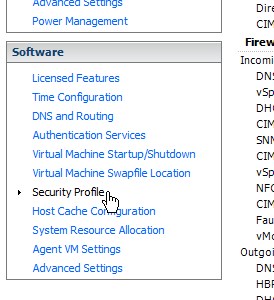
The right hand side of the screen should now display the security profile details.
Click on the “Properties” link located to the right of the “Services” title/section.
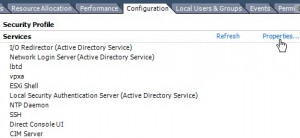
You will now see a list of services, and their running status.
You will notice that “SSH’ will be stopped.
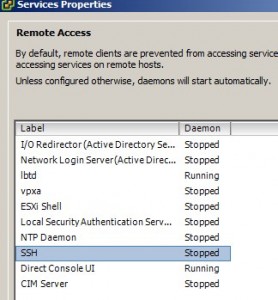
Highlight the “SSH” service, and click the “Options” button.

The window that will appear shows the service status, startup policy settings, and also allows you to stop and start the service.
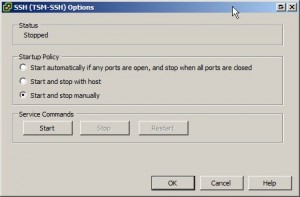
Click the “Start” button in the “Service Commands” section to start the SSH server service.

Click “OK” to close the SSH options window.
Click “OK” to close the services properties window.
You should now be able to SSH into the VMWare server now.
To prevent any further SSH connections, follow the above steps, but click the “Stop” button to stop the SSH service.
After installing VMware ESXi 4 (otherwise known as VMware vSphere), you will find that there doesn’t seem to be a method to actually get into the system, and edit any configuration files. All the configuration should be done via the VMware vSphere Client, vCenter, or another VMware utility, but sometimes there might be times where the only option is to get dirty, and edit configuration files manally. Thankfully ESXi/vSphere provides the ability to do it, however they call it “Tech Support Mode”, and as such, they make it known that the “Tech Support Mode” is not supported unless used in consultation with VMware tech support.
By default, the SSH service is disabled, so if you do end up needing to get access to the console (either with VMware tech support, or without), you must do it physically infront of the server. Im most cases where ESXi/vSphere will be being used, is in the data centre, and its not always easy to get physical access to the server, so this article will make it possible to connect in remotely.
Start by going to the physical ESXi/vSphere server. The screen should have the ESXi status screen on the monitor. From here, hold down the alt key on the keyboard, and press the F1 key. This will bring you to a virtual terminal. It should look like the following picture.
![]()
Anything you type on the keyboard here will not output on the screen.
Type “unsupported” and hit Enter. This will kick off the unsupported console session, and ask you for a password.

Again, you wont be able to see the password being typed in. Type the “root” password which would have been set by you, and hit Enter.
You will now be presented with a message from VMware about how this is a unsupported feature.
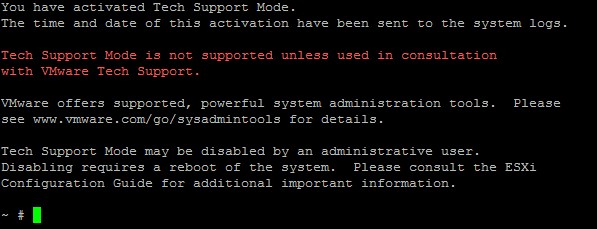
Once you have this console session going, its time to enable SSH access.
Type “vi /etc/inetd.conf” to open up the config file that we need to change.
![]()
Once the file opens, scroll down using pageup/page down, and the arrow keys, and find the line starting with “#ssh”. The “#” character at the start of this line means that it is simply a comment, and will be ignored.

Make sure the cursor is at the beginning of the first SSH line, and press the delete key to delete the “#” character. Only the first SSH line needs to be un-commented, unless you explicitly need access to the SSH server using IPv6.

To save the changes, type in “:wq” and hit enter. The command will display down the bottom of the screen as you type it.
![]()
Now that the configuration file has been modified, you will need to reboot the server for the changes to take effect. Simply type “reboot” and press enter.
![]()
After the system has rebooted, you should be able to use a SSH client, and remotely connect into the ESXi/vSphere host.
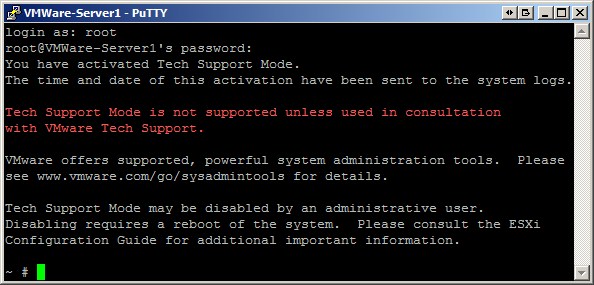
Please note that you will need to log in via SSH using the “root” username. The “unsupported” method only works from the physical console of the ESXi server.

